
![Ethical Hacking series [Part 1]: Installing Kali Linux and Setting Up DVWA on VirtualBox](https://hackproofhacks.com/wp-content/uploads/2024/05/Grey-Minimalist-Tips-Blog-Banner-1024x576.png.webp)
Introduction
Hey there! Welcome to the Part 1 of our Ethical Hacking Series. Today, I am going to tell you how you can install Kali Linux and setup DVWA on your Windows machine using VirtualBox.
Welcome to the first step in your journey from beginner to pro hacker. If you’re here, you’re likely eager to dive into the world of hacking, and you’re in the right place! In this series, we’ll walk you through everything, from the basics to advanced techniques. But before you can start learning vulnerabilities and testing your hacking skills, you need a safe space to practice. That’s where a virtual hacking lab comes in.
Think of a virtual hacking lab as your personal playground. It offers a controlled, isolated environment where you can practice your hacking skills without worrying about damaging your main system or breaking any laws.
In this guide, I’m going to walk you through the step-by-step process of setting up your very own virtual hacking lab. We’ll be using VirtualBox, a free and open-source virtualization software, along with Kali Linux, a powerful Linux distribution specifically designed for penetration testing and ethical hacking. We will also be going to install DVWA on our Kali Linux localhost. By the end of this tutorial, you’ll have a fully functional virtual lab where you can safely practice your hacking skills.
Table of Contents
Why setting up a Virtual Hacking Lab is important?
Let’s talk about why setting up a virtual lab is so important.
- First and foremost, safety: Practicing hacking directly on live systems can lead to unintended consequences. You could accidentally delete important files, corrupt your operating system, or even expose your personal data.
In a virtual lab, any mistakes you make are contained within the virtual environment. You can simply reset the virtual machine and start fresh without any real damage. - Next is isolation. A virtual lab isolates your hacking activities from your main operating system.
This means that any viruses, malware, or other harmful software you encounter won’t affect your main system. Your personal files, applications, and data remain safe and untouched. - Another fantastic benefit is convenience: Virtual labs can be easily reset and reconfigured.
Want to try a different hacking tool or technique? No problem!
You can set up different scenarios, test various configurations, and experiment to your heart’s content.
If something goes wrong, you can just revert to a previous snapshot or reset the environment.
This flexibility is invaluable for learning and perfecting your skills.
So, let’s get started! Follow along, and soon you’ll have your virtual hacking lab up and running.
What is Virtualbox and How to install?
With the help of the virtualization program VirtualBox, you can run multiple operating systems on a single physical computer. In this section, we’ll walk through the process of downloading and installing VirtualBox on different operating systems.
Introduction to VirtualBox:
Before we begin, let’s understand what VirtualBox is and why it’s essential for setting up your virtual hacking lab. The virtualization program VirtualBox was created by Oracle and is available for free and open source. It allows you to create and manage virtual machines, which are self-contained environments that emulate physical computers. With VirtualBox, you can run multiple operating systems simultaneously on your computer, making it an ideal tool for creating isolated environments for hacking practice.
Downloading VirtualBox:
To get started, you’ll need to download the appropriate version of VirtualBox for your operating system. Follow these steps:
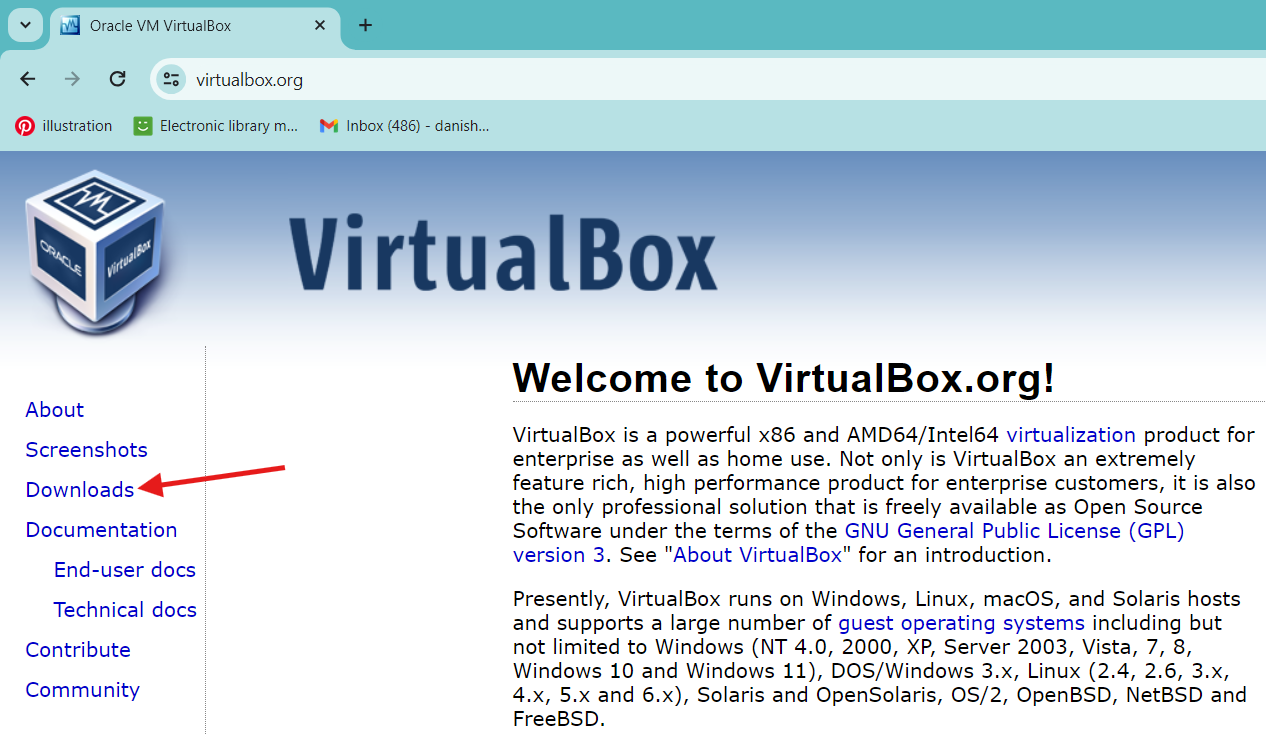
- Open your web browser and navigate to https://www.virtualbox.org/.
- On the VirtualBox homepage, click on the “Downloads” button.

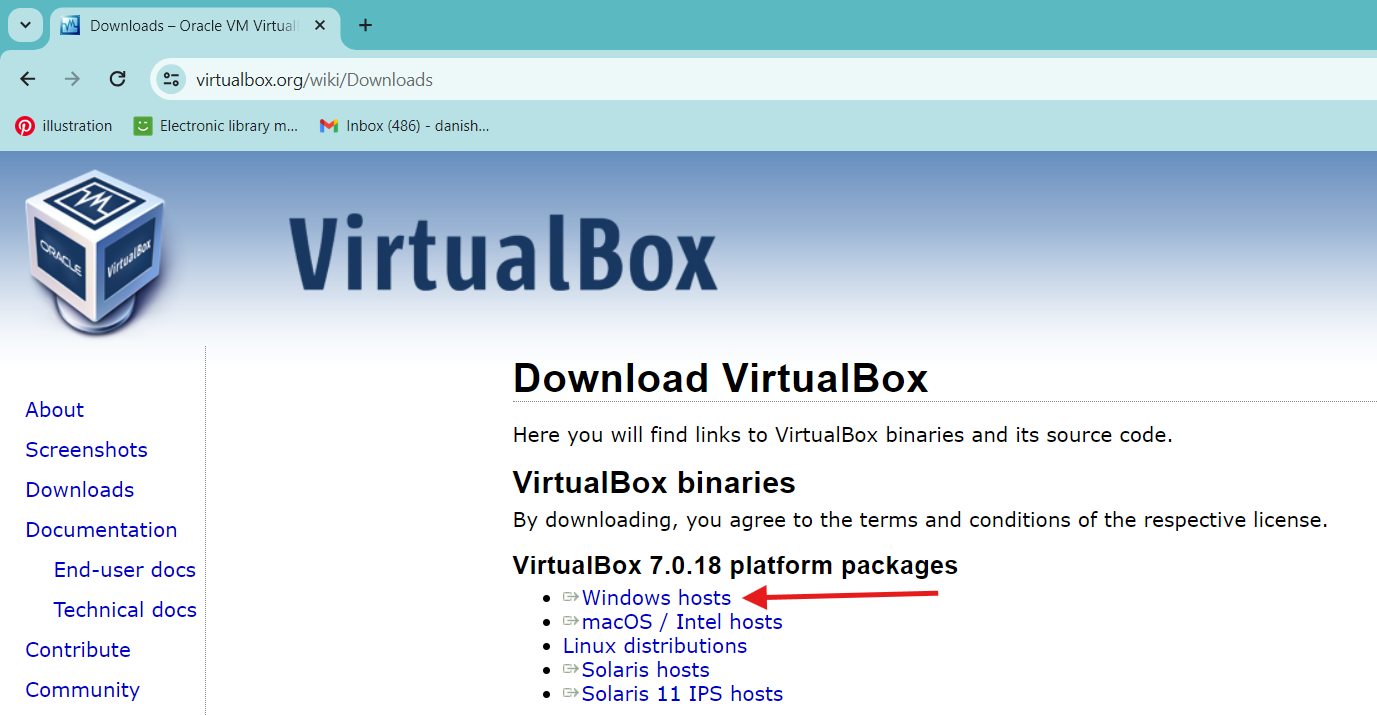
- You’ll be directed to the downloads page where you’ll see the latest version of VirtualBox available for various operating systems.
- Click on the link according to your operating system. I am selecting Windows in this case. VirtualBox supports Windows, macOS, Linux, and Solaris.

- Choose the version appropriate for your system architecture (32-bit or 64-bit).
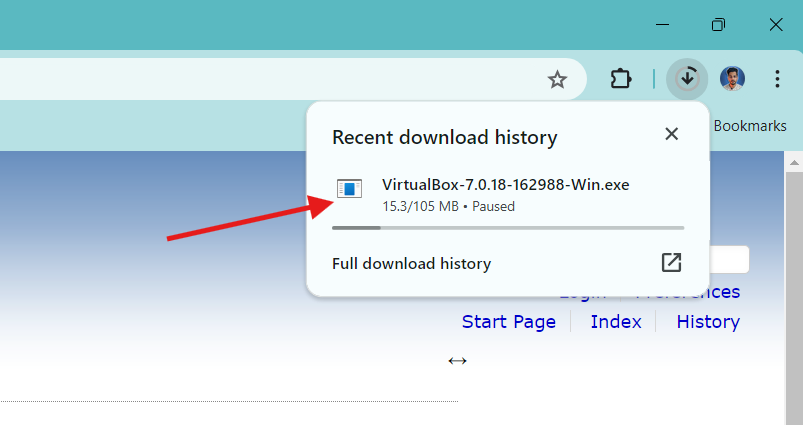
- Once you’ve selected your operating system, it’ll start downloading the VirtualBox installer.

Installing VirtualBox:
Now that you’ve downloaded the VirtualBox installer, let’s proceed with the installation process. Follow these steps based on your operating system:
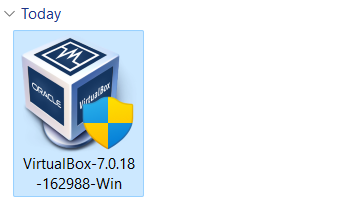
- Once the download is complete, locate the VirtualBox installer file (usually named something like “VirtualBox-<version>-Win.exe”) and double-click to run it.

- The VirtualBox installation wizard will open. Click “Next” to proceed.
- Read and accept the license agreement, then click “Next.”
- Choose the installation options you want (you can usually stick with the default settings) and click “Next.”
- Click “Install” to begin the installation process.
- Once the installation is complete, click “Finish” to exit the wizard.
- VirtualBox is now installed on your Windows system and ready to use.
Configuring VirtualBox:
After installing VirtualBox, you may want to configure some settings to optimize its performance or customize its behavior. Here are a few things you might want to consider:
- Virtual Machine Default Folder: By default, VirtualBox stores virtual machine files in your home directory. You can change this location in the VirtualBox preferences if desired.
- Network Settings: VirtualBox allows you to configure various network settings for your virtual machines, including NAT, Bridged, and Host-only networking. You can adjust these settings in the VirtualBox preferences.
That’s it! You’ve now successfully installed VirtualBox on your computer. In the next section, we’ll dive into setting up Kali Linux, the operating system we’ll be using for our virtual hacking lab.
How to add Kali Linux as a Virtual Hacking Machine in VirtualBox on Windows?
Now that you have VirtualBox installed, it’s time to set up Kali Linux, a powerful and versatile operating system used extensively for penetration testing and ethical hacking. Follow these detailed steps to create a virtual machine (VM) for Kali Linux in VirtualBox.
Step 1: Download Kali Linux ISO
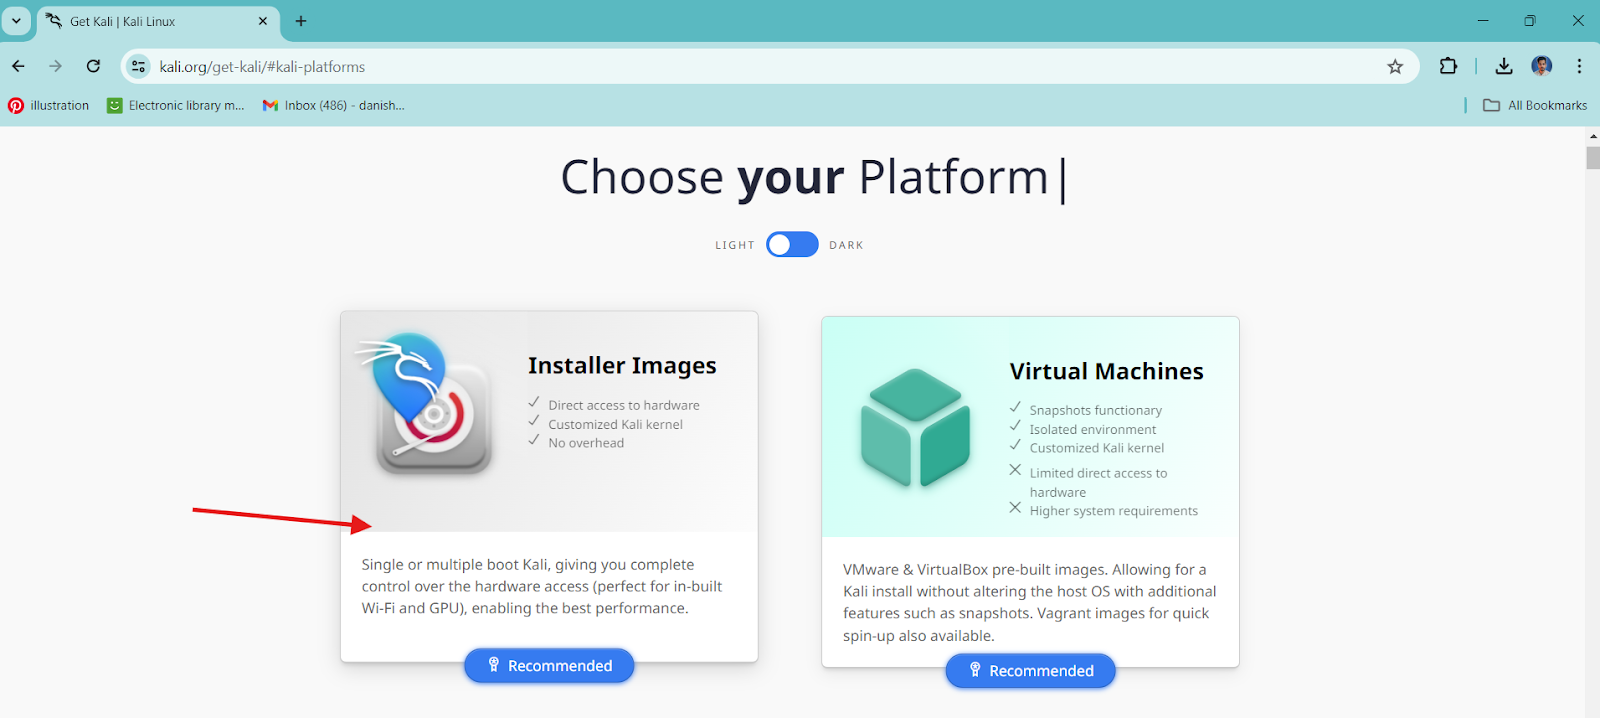
- Open your web browser and go to the Kali Linux official download page. Click on the download button.

- Now, click on Installer Images.

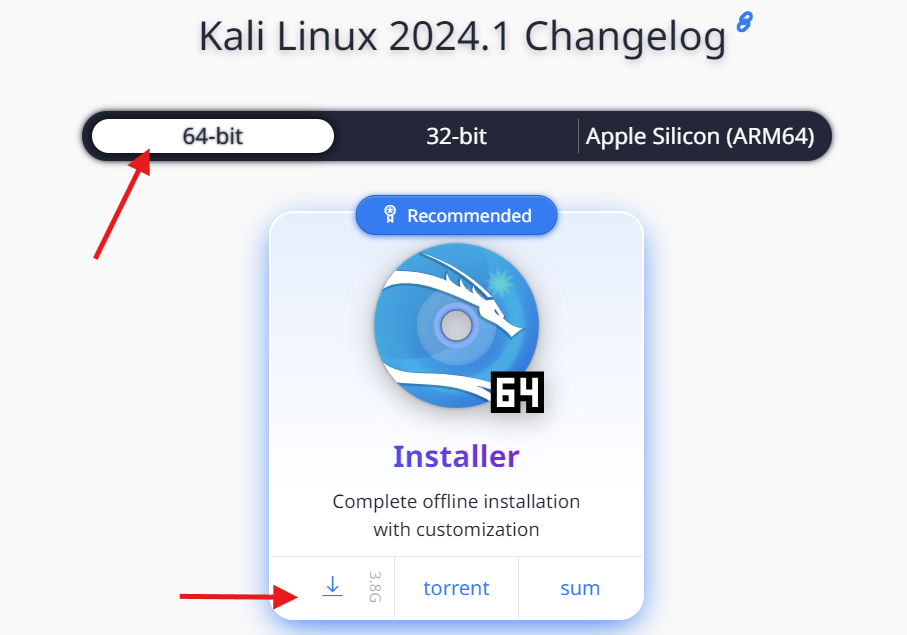
- Scroll down to the installer section, select your system architecture, and click the download icon.

Step 2: Create a New Virtual Machine in VirtualBox
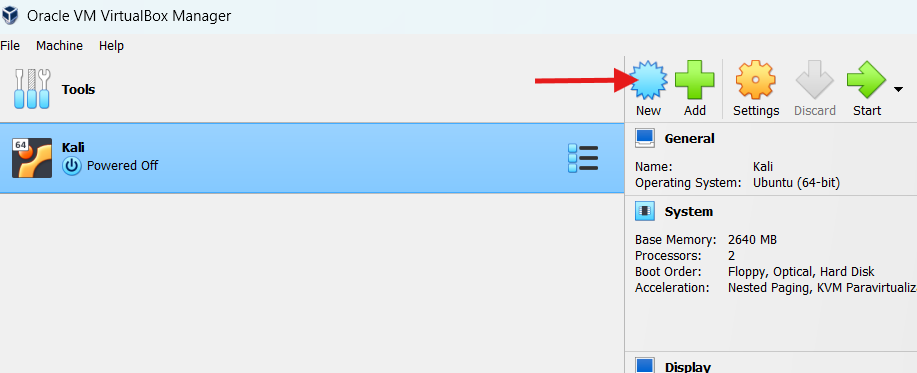
- Launch VirtualBox from your applications menu or desktop shortcut.
- Click on the “New” button in the VirtualBox Manager to create a new virtual machine.

- Enter a name for your VM, such as “Kali Linux”. Set the “Type” to “Linux”.
- Set the “Version” to “Debian (64-bit)” if you’re using a 64-bit version of Kali Linux.
- Leave the Folder Name as it is (default location for VM files).
- In the ISO Image field, browse for the Kali Linux ISO file you downloaded.

- Click on ‘Next’ and then ‘Finish’.

Step 3: Configure the Virtual Machine
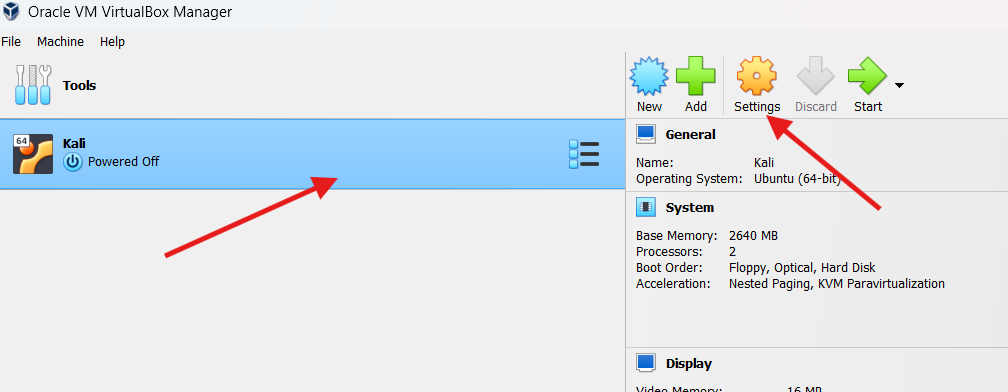
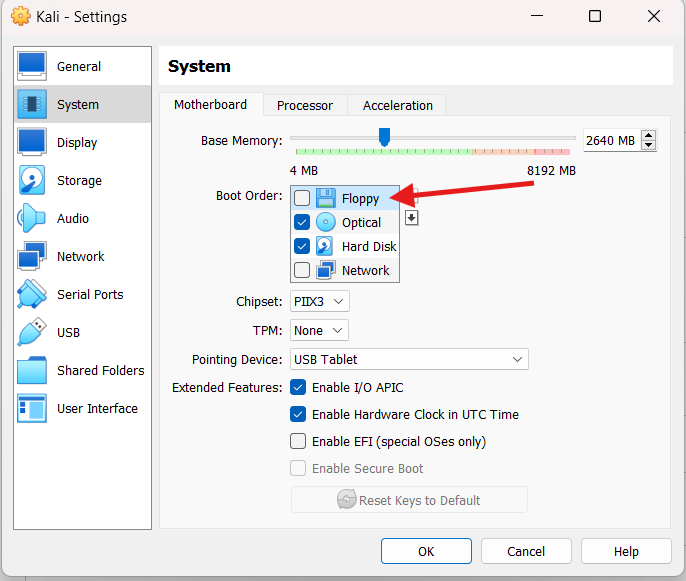
- Select your newly created VM from the list in VirtualBox and click on the “Settings” button.

- Go to the “System” tab. Under the “Motherboard” tab, ensure the “Floppy” is unchecked to speed up the boot process
- In the base memory, allocate 2 GB to 4 GB of RAM (Min Recommended: 2GB for better performance).
 .
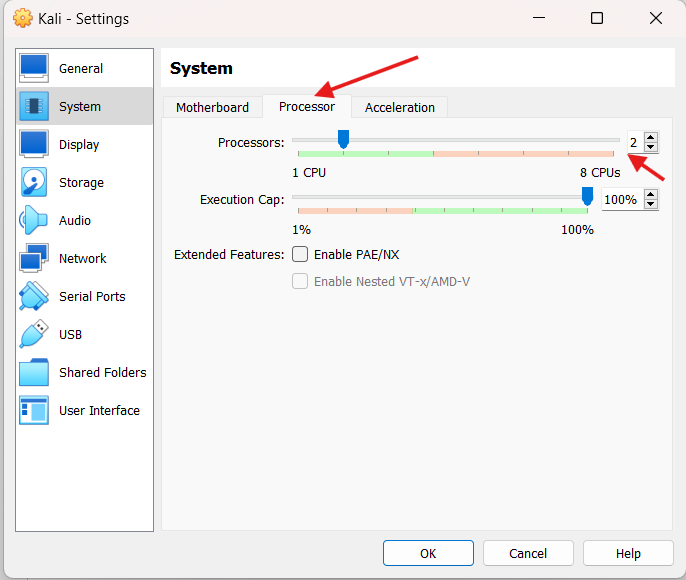
. - In the “Processor” tab, allocate at least two CPUs to the VM if possible.

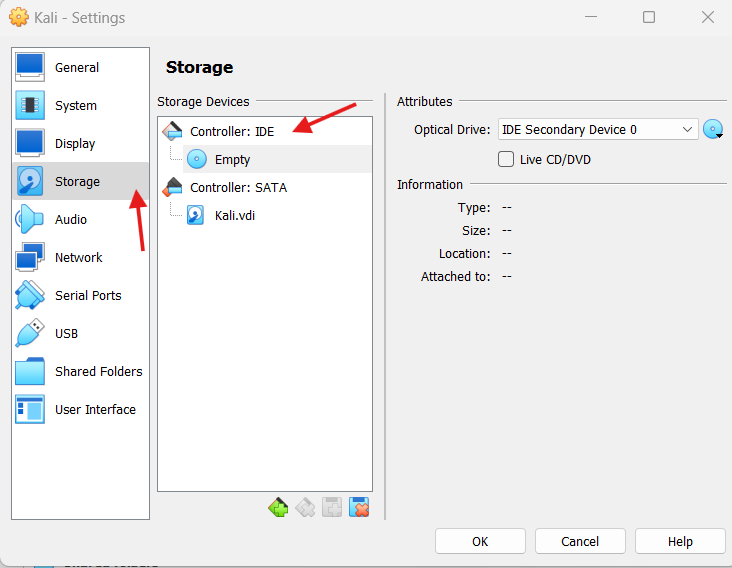
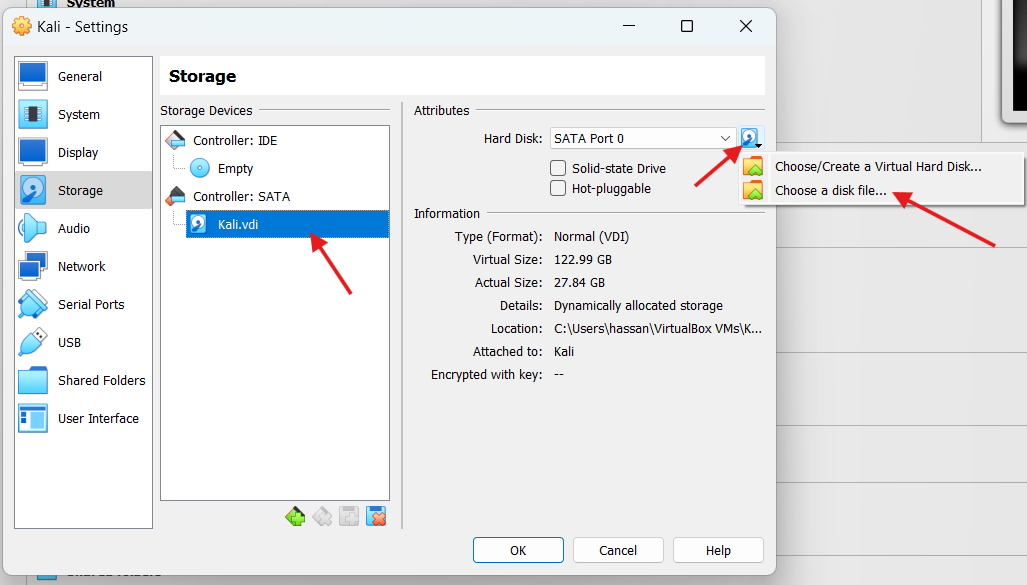
- Navigate to the “Storage” tab. You’ll see a “Controller: SATA” with an empty disk icon labeled “Empty”.

- Click on the “Empty” disk icon, then click on the disk icon next to “Optical Drive” and select “Choose a disk file”.
- Browse to the location where you downloaded the Kali Linux ISO file and select it.

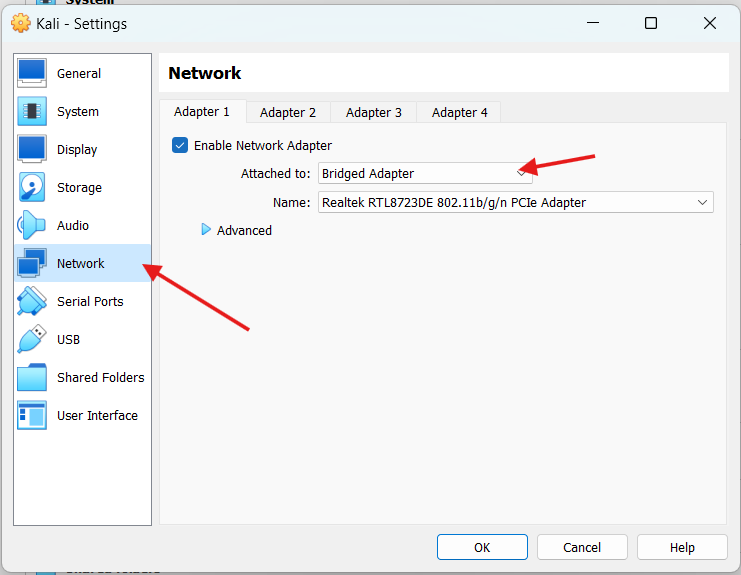
- Go to the “Network” tab. By default, the “Attached to” setting should be “Bridged Network”

- To easily share files between your host and VM, go to the “Shared Folders” tab, click the folder icon with a plus sign, and add a shared folder path.

 .
.
Step 4: Install Kali Linux on the Virtual Machine
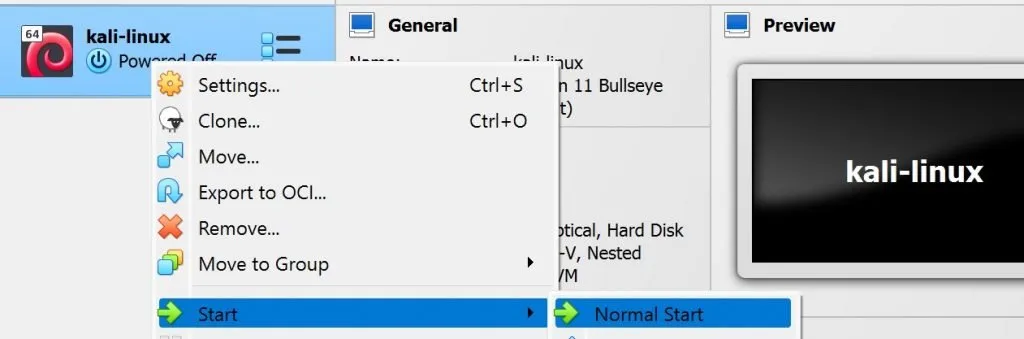
- Click “Start” to boot the VM. The VM will boot from the Kali Linux ISO file you attached.

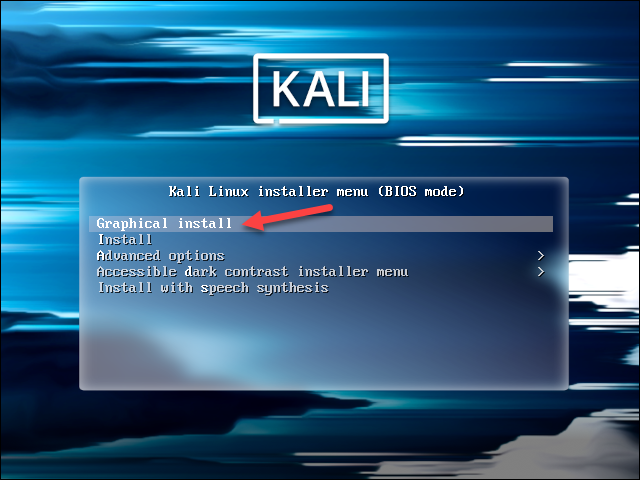
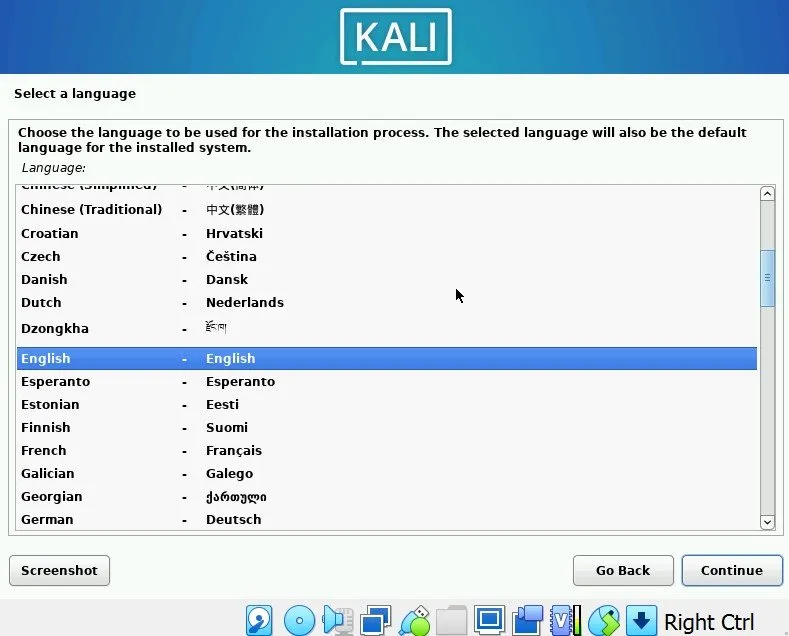
- In the Kali Linux boot menu, select “Graphical Install” using the arrow keys and press Enter.

- Choose your preferred language, location, and keyboard layout.

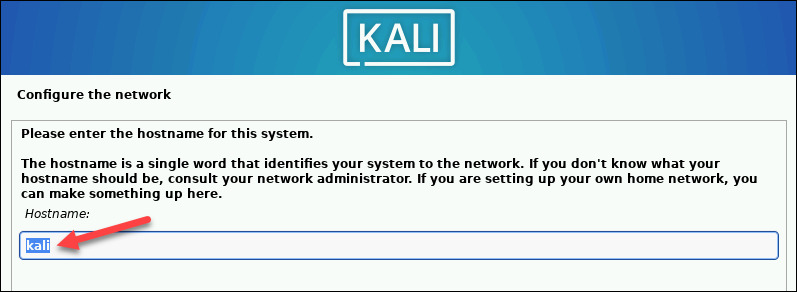
- Enter a hostname for your system (e.g., “kali”).

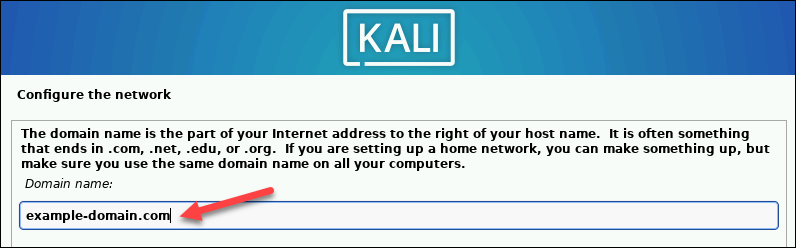
- Optionally, provide a domain name if you’re on a network that requires it. If you are a beginner then leave this field.

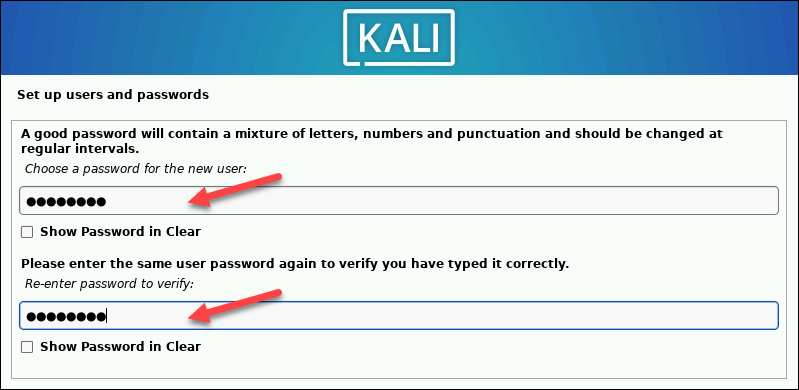
- Set a strong password for the root user account.

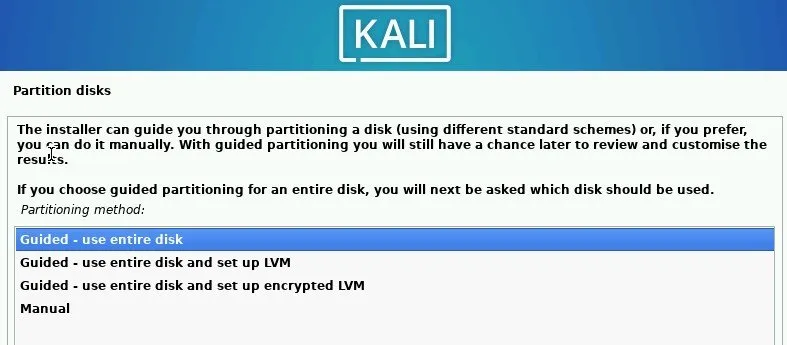
- For simplicity, choose “Guided – use entire disk”.

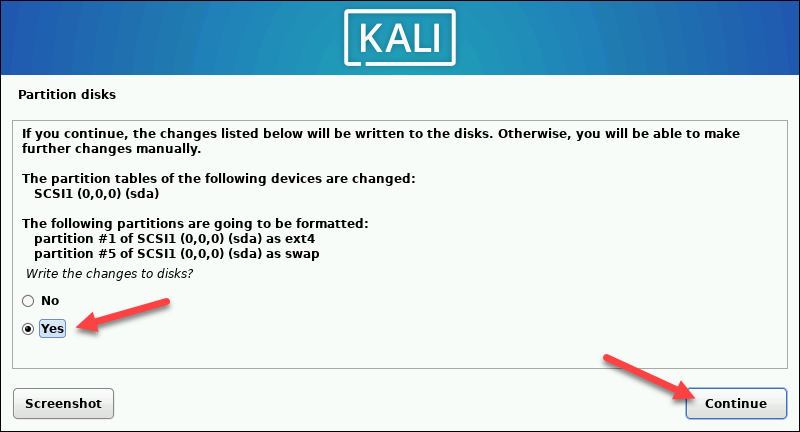
- Now, select “Yes” and hit continue.

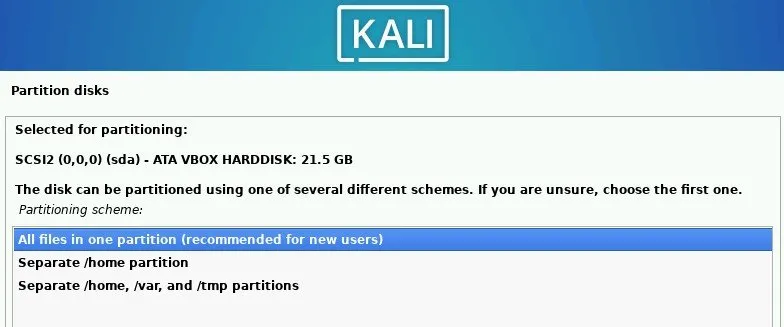
- Select the virtual disk and follow the prompts to partition it. Choose “All files in one partition” for beginners.

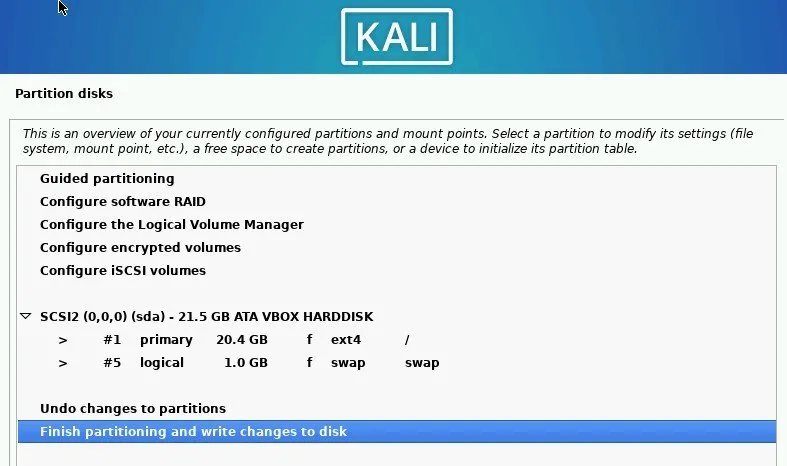
- Click “Finish Partitioning and write changes to disk”. On the following screen, click Yes.

- As directed by the on-screen directions, proceed with the installation.

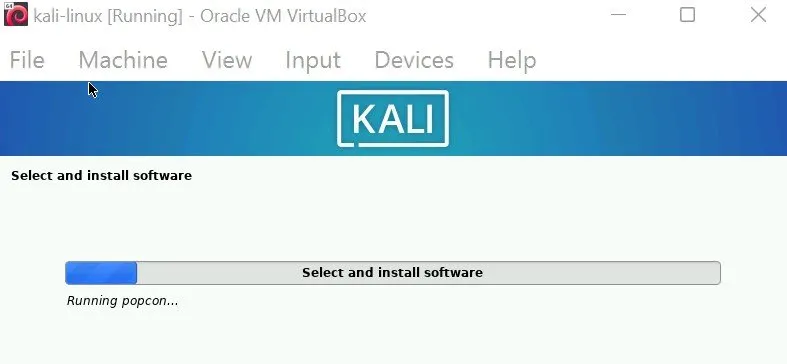
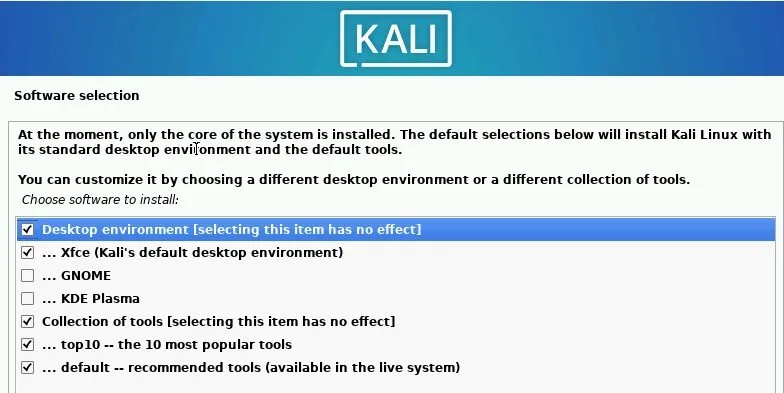
- Choose the following options (default), which include the Xfce desktop environment and important hacking tools, when the dialog below displays. Press Enter to proceed.

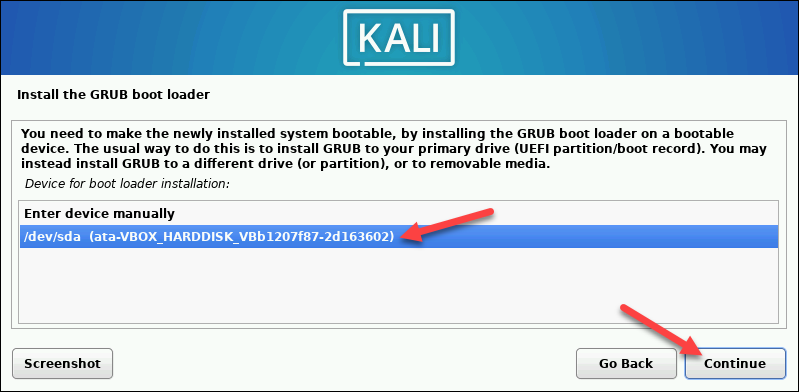
- Wait for the installation to complete. This process takes about 10 minutes. Near the end, the installer will ask about installing GRUB. Select “Yes” and choose “/dev/sda” to proceed.

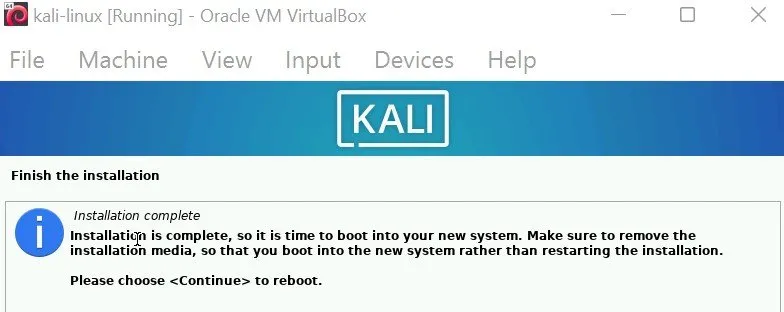
- After that, it will show a message of Installation complete.

Step 5: Initial Setup of Kali Linux
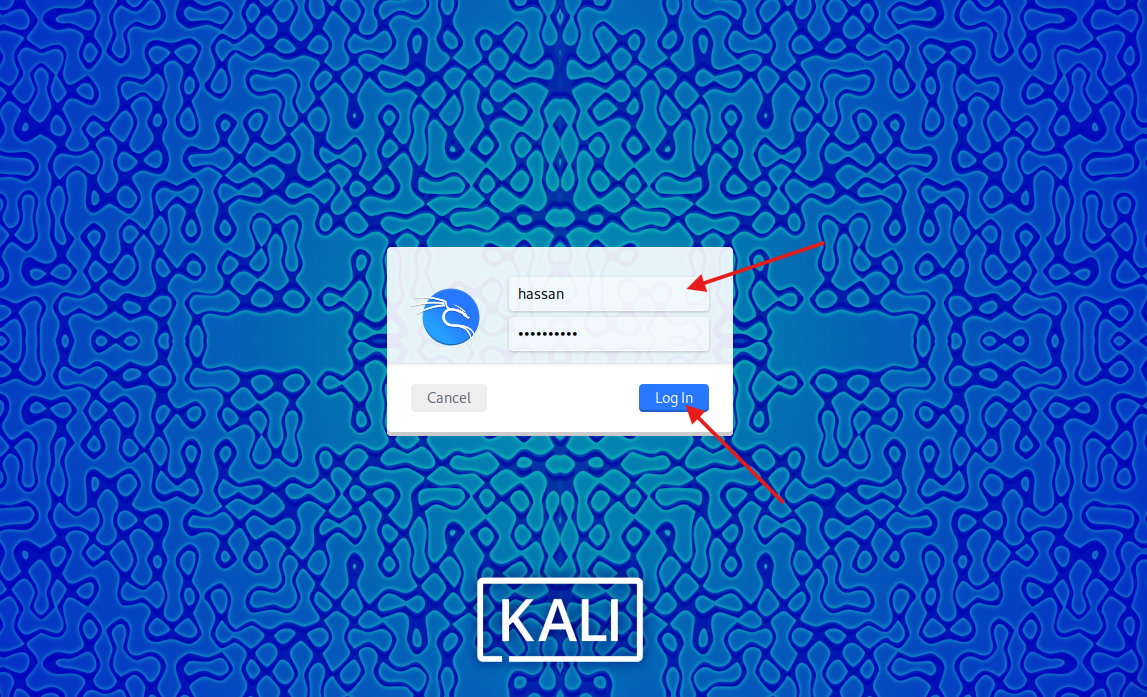
- After rebooting, log in using the root account and the password you set during installation.

- Open a terminal and run the following commands to update your system:
sudo apt-get update && sudo apt-get upgrade
Congratulations! You’ve successfully installed Kali Linux as a virtual machine in VirtualBox. Now, you can use this machine to run different hacking tools. Now, you have a robust and isolated environment to practice ethical hacking. In the next section, we’ll explore adding vulnerable machines to your lab, enhancing your practical experience.
How to Set Up DVWA Locally in Kali Linux as a Virtual Hacking Lab?
In this section, i am going to show you how you can set up DVWA (Damn Vulnerable Web Application) on your Kali Linux machine. DVWA is an excellent tool for practicing web application security as it contains numerous vulnerabilities for you to exploit and learn from. Follow these steps to install and configure DVWA on your Kali Linux local host.
Step 1: Update Kali Linux: Before installing DVWA, it’s essential to update your system to ensure all packages are current. Open a terminal and run the following commands:
sudo apt update
sudo apt upgrade -y
Step 2: Install Required Packages: DVWA requires several packages, including Apache, MySQL, and PHP. Install these by running the following command in your terminal:
apt install -y apache2 mariadb-server mariadb-client php php-mysqli php-gd libapache2-mod-php
Step 3: Download DVWA: Next, download the latest version of DVWA from its official GitHub repository. Navigate to your web root directory and clone the DVWA repository:
cd /var/www/html
sudo git clone https://github.com/digininja/DVWA.git
Step 4: Start Services: Now start Apache and MySQL servers by giving these commands:
service apache2 start
service mysql start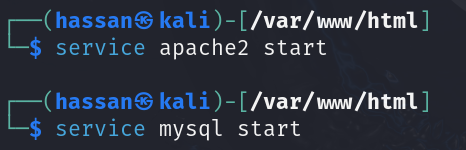
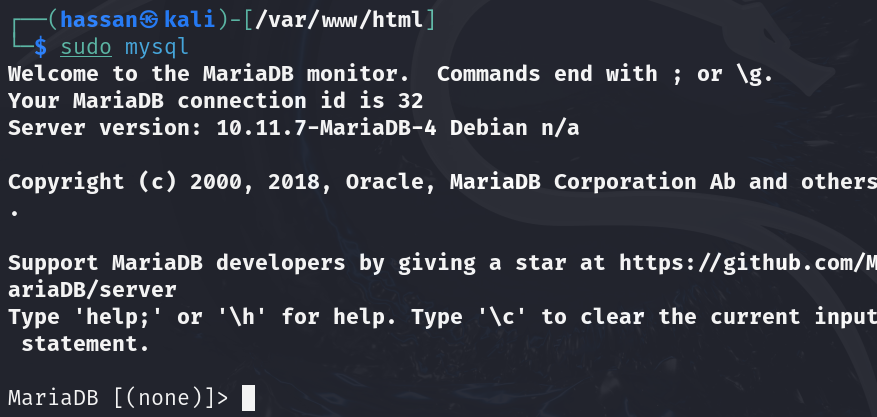
Step 4: Configure MySQL server: Run these commands on the terminal:
- sudo mysql

- create database dvwa;

- create user dvwa@localhost identified by ‘p@ssw0rd’;

- grant all on dvwa.* to dvwa@localhost;

- flush privileges;


Step 5: Configure DVWA files:
- Navigate to the DVWA configuration directory:
cd /var/www/html/DVWA/config
- Copy the sample configuration file:
sudo cp config.inc.php.dist config.inc.php

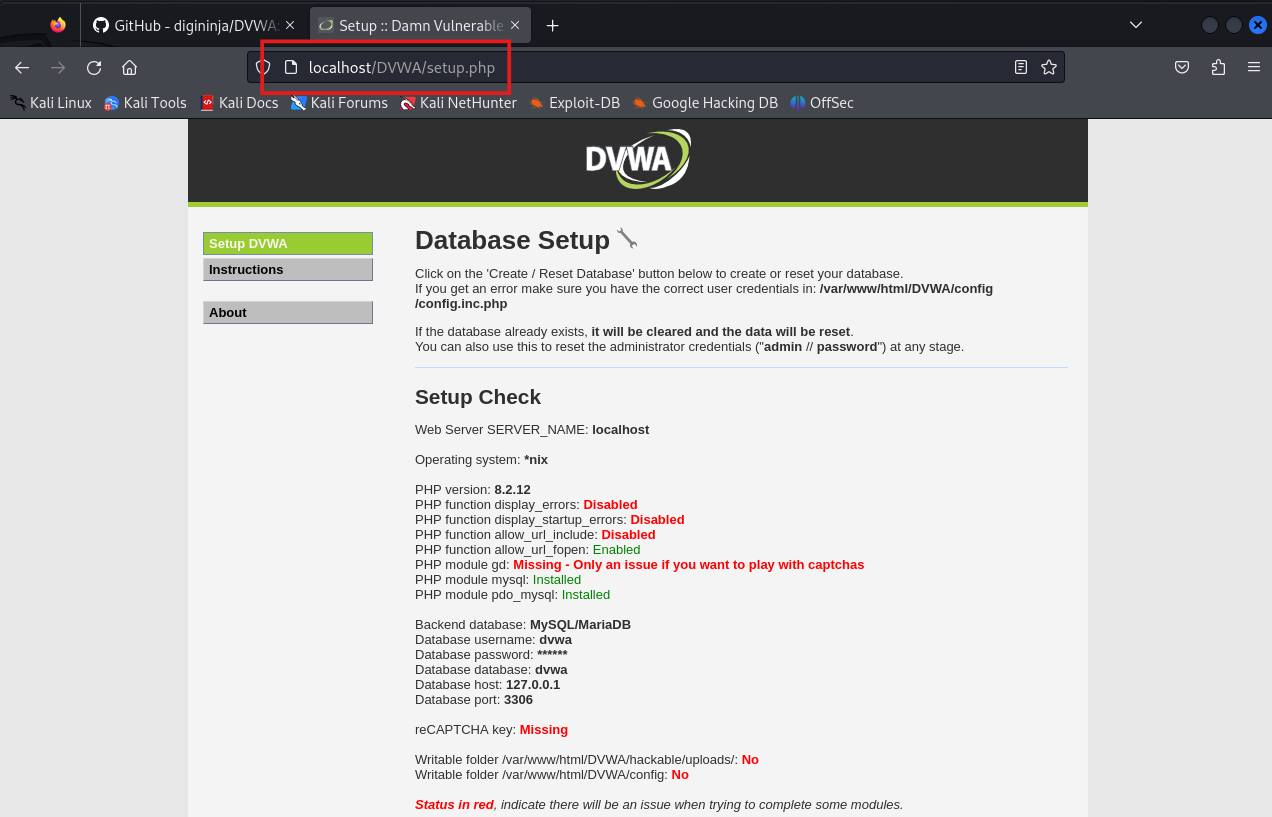
Step 7: Set Up DVWA:
- Open a web browser and navigate to http://localhost/DVWA/setup.php

- On the setup page, click on the “Create / Reset Database” button to set up the database.

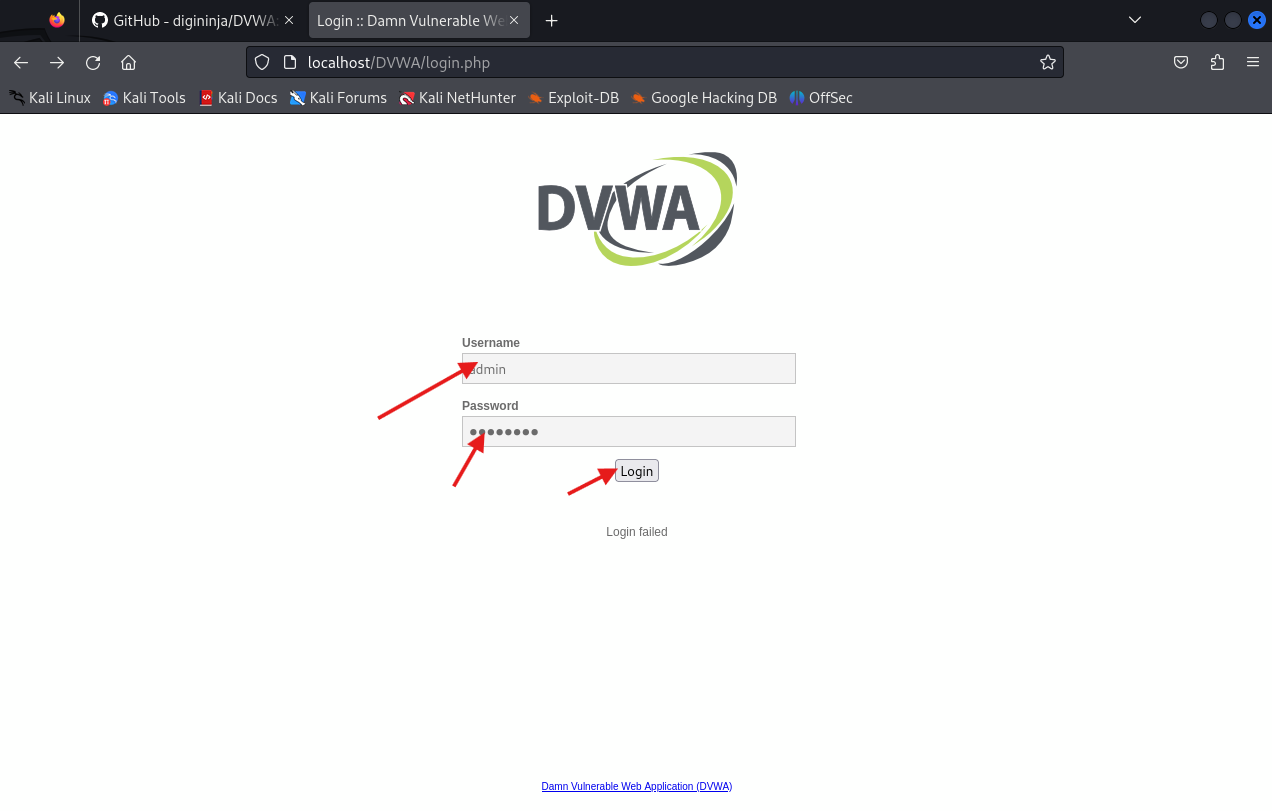
- After setting up the database, navigate to the login page at http://localhost/DVWA/login.php
- Use the default credentials to log in:
Username: admin
Password: password
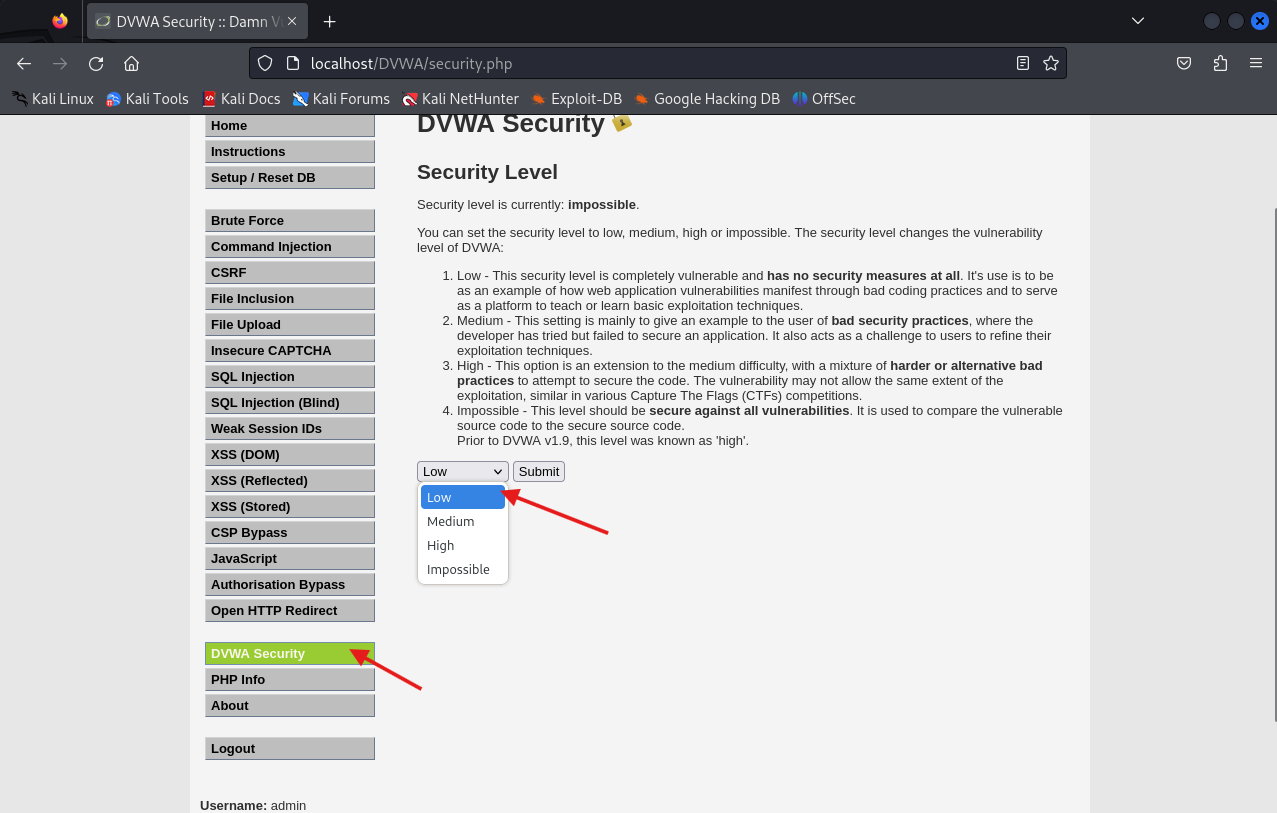
- Once logged in, go to the “DVWA Security” tab. Set the security level to low for practice and exploration.


You’ve successfully installed and configured DVWA on your Kali Linux localhost. Now, you can start practicing web application security and exploring the various vulnerabilities provided by DVWA. This environment will be a valuable tool for learning and honing your ethical hacking skills. Happy hacking!
Conclusion
You now have a solid foundation for a personal hacking lab. You can experiment with different tools, learn new techniques, and understand the intricacies of cybersecurity in a controlled, safe environment. This lab will be an invaluable resource as you continue your journey in ethical hacking, providing you with the hands-on experience needed to build and refine your skills.
As you progress, remember to explore additional vulnerable machines and web applications, continuously challenging yourself to learn and adapt. The field of cybersecurity is ever-evolving, and staying ahead requires ongoing practice and education. Happy hacking, and may your journey in the world of ethical hacking be both enlightening and rewarding!